The DIY thread - DIYourself

As someone who had a Garmin head unit with a bad battery, bought a new battery, swapped it to make sure it worked but didn't seal it down correctly so it bounced around while riding and then opened it back up to seal down the battery but then broke the buttons on the circuit board...

Avoid opening it if you can. :)
Thanks for validating my decision NOT to try any solution that involves opening the case.
 
Was deciding to post this in the smile thread or here but picked here because it was at the top of the "latest posts" section when I logged in.

Probably about 6 months back my trusty reliable 10+ year old Garmin 510 bit the dust. It would not stay on and when it did it kept saying "loading..." and then would shut off. And of course that day I did a long ride and lost the file. On further inspection the rubberized front cover section which also had the buttons molded in was disintegrating underneath the nice silicone cover for the lap and power buttons. I stopped short of throwing it against a wall back then and its been sitting on my basement work from home desk ever since.

For some reason last night I decided to plug it in and try to power it on, and it was still doing the same thing (duh of course). But then I did a google search and after a few tries and combinations, came up with a web site from 10 years ago that exactly described my issue and how to fix it which consists of:

1. connect to computer/USB​
2. hold lap button​
3. hold power button​
This forces the device into Mass Storage mode and then from the computer, locate and delete all the activity and course files - error/frozen screen is due to one or more of these being corrupt.​
I was thinking to myself, there's no way I didn't find this and try it 6 months ago. or did I?

To test this I used a rolled up rubber bands and stuffed into the spots where the buttons were missing, plugged into laptop and then heard the most magical sound when a USB device is connected! Deleted all the files, restarted the Garmin and boom baby its back online!

Now my brain starts running away with ideas on how to fix the buttons - of course search online and find a replacement cover right? Yeah. No. even used they cost $50 or more and the device isnt worth that much. Plus I don't have @Patrick skills to take this apart and change screens etc... risk damaging it further since really its just the buttons that are missing. Because at that point I should change the battery too but again totally not worth it.

Hmm.. Silicone/Caulk - no might drip into the electronics unless I squeeze some out on a piece of cardboard and then shape it with a knife to fill in the whole
Oh wait - hot glue gun - i can melt some and once it cools a little shape it to fit in the holes.
even better, just cut some pieces off the cold glue stick and wrap it with some tape!

So here's the pictures and the results. It might not be ready for a rainy day any more but at least its functioning properly. I have yet to take it on a test ride but will do a short ride to make sure everything connects, saves and syncs.

Little wins like this sometimes make up for crappy days.

View attachment 234592View attachment 234593View attachment 234594View attachment 234595View attachment 234596View attachment 234597

thats some good thinking, but im going to float a crazy idea here.

if you have ONE intact button and a 3d printer you could likely print a replacement cover some TPU would likely give you enough flex to work the buttons properly, and if you silicone glue around it you would have a rain ready setup
 
As someone who had a Garmin head unit with a bad battery, bought a new battery, swapped it to make sure it worked but didn't seal it down correctly so it bounced around while riding and then opened it back up to seal down the battery but then broke the buttons on the circuit board...

Avoid opening it if you can. :)

idk i opened my 1000 to replace the screen 3 times i think and never had a problem, i think yours was a user error issue
 
thats some good thinking, but im going to float a crazy idea here.

if you have ONE intact button and a 3d printer you could likely print a replacement cover some TPU would likely give you enough flex to work the buttons properly, and if you silicone glue around it you would have a rain ready setup
yeah I dont have access to do something like that, and the buttons are integrated into the top cover/screen of the Garmin itself.

im pretty happy with the 10 minute hack job I did for however much longer it lasts. I also have an 810 that I have been using as my main device, and a 520 that a friend gave me when he was getting out of the sport due to health reasons, so this will be 3rd in line in terms of usage going forward.
 
idk i opened my 1000 to replace the screen 3 times i think and never had a problem, i think yours was a user error issue
Wasn't I clear it was 100% user error?

The issue was the 2nd time removing the main board, not the screen. Just the screen is easy.
 
I destroyed a 520 trying to replace a battery. I was pretty careful too.
 
Could also strip both wires and just crimp one barrel over both wires.

Pick a barrel that can take both wires together. If the barrel is too short just cut in half and crimp the one half over both wires.

Then heat shrink.
1711559041079.png
 
id be looking to cut back the overmolded strain relief to get enough for solder and heat shrink, but thats obviously a tough one here.

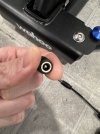
whats if part of? and whats the plug in your hand look like?
This is my trainer. Before they will send me a new one, they made me “decommission” my old one. Kind of weird, but whatever.


Here’s a better look at the plugs

IMG_0374.jpegIMG_0373.jpegIMG_0372.jpegIMG_0371.jpeg
 
You may be able to just buy a screw connector that would go into your existing power unit.

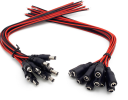
If it were me I'd open up the trainer to see what the inside looks like. You may be able to buy a connector with wire leads and just completely replace that section and it'll be like new. Splice inside the trainer.

1711563110433.png

1711563054713.png
 
You may be able to just buy a screw connector that would go into your existing power unit.

If it were me I'd open up the trainer to see what the inside looks like. You may be able to buy a connector with wire leads and just completely replace that section and it'll be like new. Splice inside the trainer.

View attachment 235096

View attachment 235095


i was thinking the exact same thing,
 
Red goes to Red and Black goes to Black...
That’s basically what I did. With some electric tape. lol. It’s only got to last for another few training sessions and then I’ll have the new one.
 
That’s basically what I did. With some electric tape. lol. It’s only got to last for another few training sessions and then I’ll have the new one.
So they made you “destroy” it by showing you cut the wires ?

Guess that means the old trainer still kinda works until it doesn’t and then do you have to send it back to them ?
 
So they made you “destroy” it by showing you cut the wires ?

Guess that means the old trainer still kinda works until it doesn’t and then do you have to send it back to them ?

Nope. They said to toss it “responsibly”
IMG_0376.pngIMG_0377.png
 
Back
Top Bottom