The DIY thread - DIYourself

View attachment 255018

Ordered new quill and pulley bearings for the drill press I bought. While that was going on, I cleaned all the business parts, and made a proper set of depth-stop nuts, since the orginals were long [presumably] lost. The press was obviously repainted--well, surprisingly--at some point, since it's 1) the wrong color, and 2) the ultrasonic cleaner literally flaked the paint off the return spring cover/depth stop holder. They got a coat of acid-etch and black enamel. Later on, the whole press might get re-done, but I don't really feel like hanging a 50 pound casting to spray paint it.

I also filled in the newbie marks on the work table, just to get the surface flat(ish) again.

Pictures of the drill press? Anything interesting? I went through similar with an Atlas press that I picked up a few years ago.
 
Pictures of the drill press? Anything interesting? I went through similar with an Atlas press that I picked up a few years ago.

It's a Walker-Turner 900 15". The belt cover and original motor are gone, but it has the original JT33 spindle with the removal nut on it.

I found out afterwards that the bearings by SKF were strange metric/imperial hybrids, so there really aren't readily available replacements.

Pictures will follow later when it's reassembled.

Oh yeah, definitely familiar with WT weird bearing sizes. I have one of their bandsaws and same deal.

If you haven't already checked it out, owwm.org is a old resource. There's also a Walker Turner place in CT that's supposed to have parts but I've never contacted them: WTSERVICE@walkerturnerllc.com
Yeah, he's who I got the bearings from. I'm a little irked that a place that (ostensibly) sells parts for precision machines doesn't tell you who supplies their bearings, but I don't have a whole hell of a lot of choice. If they're unsatisfactory, I can always shim/sleeve...
 
PXL_20250205_223417621.jpg

The depth stop is a little crooked, but I'm leery of trying to bend the collar any more, as it's machined iron. Experience tells me it will probably snap. I'm going to shim it later, as it is exactly the kind of thing that would bother me. Half of the motor's mount is cracked, and I'm going to wait until next week to try to tackle that. The machine's motor mount is intact, though. The spindle, when it was originally pulled, had a sleeve inside the quill. No idea what it was about, since it wasn't in any of the parts diagrams, and is too long to fit the distance between the fully seated bearings. Maybe it was installed by a previous owner to try to wring some more life out of the bearings, who knows. It was well machined, at least.

I still need to re-wire it, but all the structural work is done, at this point. I scraped the table(s), scraped the sliding surfaces, and have the quill/spindle/pulley reinstalled. Runout at full extension of the quill is .005", with it fully retracted it's .003". Not half bad for a well used, 75-ish year old press. The original color of the press was sage green, as there were a few spots here/there that didn't get covered by the previous owner(s), but I'd rate the current paint job as a 9/10. Would pass casual inspection.

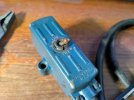
I pulled the switch to re-wire it with some leftover wire I had, but when I stripped the jacket, it was flakey/crack-y. It'll have to wait until tomorrow. It's a neat, original unit, with an Art Deco design. The factory worker must have worked with Porter Cable machinery, because they insulated the hell out of the switch. No zaps here.

PXL_20250205_224115971.jpg
PXL_20250205_224125269.jpg
 
On the bench.

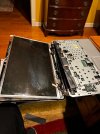
Replaced the LCD screen of an ancient laptop for no reason. Added an SSD drive and doubled the RAM to 4GB. It is now worth the same as it was with a broken lcd, no ram, and std hd.

IMG_8438.jpeg

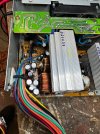
Then I needed a bench top power supply. I have a dedicated 12v. This added 5v and 3.3. used an old PC power supply and a board I picked up on amazon

IMG_8385.jpeg
IMG_8386.jpeg

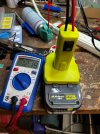
Also, my attempt clock for track and field was running off a Ryobi battery with an inverter! Then plugging in the power supply.
I picked-up a dc-dc converter, soldered it up with an Amazon battery adapter. 50% gain in run time.
IMG_8434.jpeg
IMG_8435.jpeg

Now to neaten that up a bit.
 
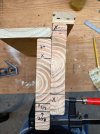
Mocking up ledger to band joist layout for my deck build. I want to go 2x10 on the ledger/joists to make a nice bounce-free deck. The house has a 2x10 band joist. IRC doesn’t really give much room for the ledger to drop to make a step down. Sharpie lines are hard limits on no-bolt zones, and the pencil line on the ledger is the highest possible location for the lower bolt (6.5” min from top of ledger).

Comparing finished floor levels, I can get at most 7/8” drop but that’s mock-up conditions and doesn’t account for real-world variations. I’m it sure if this small of a drop is worth it, it’s likely more of a trip hazard.

A 2x8 ledger gets nearly 2” of drop but everything I read puts that into trip hazard zone. I think I’m better off 2x10 and keeping it flush or just slightly dropped.

IMG_1696.jpeg


IMG_1698.jpeg


IMG_1697.jpeg
 
Last edited:
Back
Top Bottom