


You are using an out of date browser. It may not display this or other websites correctly.
You should upgrade or use an alternative browser.
You should upgrade or use an alternative browser.
The DIY thread - DIYourself
- Thread starter Red Mosquito
- Start date
tonyride
Don't piss off the red guy
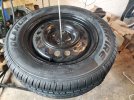
When it rains it pours. I don't usually drive my wife's car but earlier this year I drove it for some reason and I noticed the brake pedal was pulsating most likely due to warped rotors. I asked her how long have the brakes felt like this and she said she didn't know. Not to bash her but she tends to not the little things bother her if you get my drift. So I replaced the rotors and pads on her car. Soon after that my daily driver started squealing when braking but this time it was the rear brakes. Although the front were replaced a couple of times since new this will be the first time for the rear. Picture shows after 185K miles I got my money's worth. So I replaced the rear pads and rotors and compressing the calipers were a bitch and a half. Using the die to compress it works best for the Mazda. Now our third vehicle which is our road trip vehicle is starting squeal. Quick inspection of the pads show under normal circumstances they don't need immediate replacement except we have a trip to Canada coming up in October and a trip to Branson, MO in December so looks like I need to replace them sooner than later. Parts ordered.

Funny one today - I had a radon problem at the property in upstate ny, so i purchased a continuous monitor.
Of course i set it up in at home first. Double Of course my house was elevated above acceptable.
When I had an addition put on, they added a radon "port" which runs through the roof.
I purchased a fan, and installed it today. Got it all wired up, and done in an hour (not counting only 1 home depot run for wire)
Sitting at dinner, I get this weird feeling.
Nah, i couldn't have...but maybe....better check.
Yup, i installed it upside down. Nothing like forcing that radon into the basement for an hour......
Last edited:
ekuhn
Well-Known Member
I had a state facility call saying they didn't have any hot water/heat on one wing of the building. I get there, walk down to the mechanical room to chase the lines. The bottom side of the pump was screaming hot, the other side, ice cold. The flow arrow was pointing down towards the instantons unit when it should have been up towards the wing. Flip the pump and the heat came back. Everyone makes mistakes.Funny one today - I had a radon problem at the property in upstate ny, so i purchased a continuous monitor.
Of course i set it up in at home first. Double Of course my house was elevated above acceptable.
When I had an addition put on, they added a radon "port" which runs through the roof.
I purchased a fan, and installed it today. Got it all wired up, and done in an hour (not counting only 1 home depot run for wire)
Sitting at dinner, I get this weird feeling.
Nah, i couldn't have...but maybe....better check.
Yup, i installed it upside down. Nothing like forcing that radon into the basement for an hour......
serviceguy
Well-Known Member
As winter is approaching and since I will be doing some maintenance on the baseboard heating system I will have to deal with an old issue that I decided to 'forget' several times already, just because playing with bikes is easier...
The system consists of baseboard heating (original to the house) with a tankless combi boiler (added by us, heating is great, hot water pressure not so much...).
It's a very small house with a shallow crawlspace, the majority of the pipes runs under the floor making every maintenance a nightmare, which means I rarely purge the system because every time I drain it an refill it an entire section of the baseboard stays cold.
We had the plumber draining for us and it turns out the baseboard system splits in two loops when entering the foundations, then the two loops join back in the same return line near the fireplace, which happens to be at the opposite side of the house from where the loops start, and the single return line crosses the whole house back to where it enters. The location where the two loops join also happen to be the shallower part of the crawlspace and very uncomfortable to reach.
It appears that once the two loops are empty and you fill them back with new water, possibly due to their very different lenght, one loop stays filled with air and doesn't get hot. When the system was built they must have decided to address this issue adding a valve at the end of each loop so that you can manually operate them and fill the two loops separately before starting the system.
Since I may have to open the floor and access the crawlspace from the top, I was thinking to find a permanent, more convenient solution to this issue, as the way it works now requires at least two people to drain/refill the system.
I have 3 options in mind:
1 - eliminate the two loops entirely and make them into a sigle, bigger loop (would be the easyest in theory but I am concerned about the lenght of the loop and the heat transfer efficiency on the longer run).
2 - fitting a 'Y' shaped T where the two loops joing at the beginning of the single return line.
3 - remove the long single return line, extend the two loops to where they begin and join them on the same side of the house where they split, keeping the two valves system where they join. This would make it less of a nightmare to drain just because the valves would be in a more accessible location...
Any idea of what the second best option would be in this situation (where the best would be fire + new house)?
Red Mosquito
Formerly RLB the Scrapple Boy
I think a diagram of the current loops would help to make sense of the options. I don’t know much about baseboard systems but from my uneducated viewpoint eliminating the separate loops would probably be best for the simplicity factor.
As winter is approaching and since I will be doing some maintenance on the baseboard heating system I will have to deal with an old issue that I decided to 'forget' several times already, just because playing with bikes is easier...
The system consists of baseboard heating (original to the house) with a tankless combi boiler (added by us, heating is great, hot water pressure not so much...).
It's a very small house with a shallow crawlspace, the majority of the pipes runs under the floor making every maintenance a nightmare, which means I rarely purge the system because every time I drain it an refill it an entire section of the baseboard stays cold.
We had the plumber draining for us and it turns out the baseboard system splits in two loops when entering the foundations, then the two loops join back in the same return line near the fireplace, which happens to be at the opposite side of the house from where the loops start, and the single return line crosses the whole house back to where it enters. The location where the two loops join also happen to be the shallower part of the crawlspace and very uncomfortable to reach.
It appears that once the two loops are empty and you fill them back with new water, possibly due to their very different lenght, one loop stays filled with air and doesn't get hot. When the system was built they must have decided to address this issue adding a valve at the end of each loop so that you can manually operate them and fill the two loops separately before starting the system.
Since I may have to open the floor and access the crawlspace from the top, I was thinking to find a permanent, more convenient solution to this issue, as the way it works now requires at least two people to drain/refill the system.
I have 3 options in mind:
1 - eliminate the two loops entirely and make them into a sigle, bigger loop (would be the easyest in theory but I am concerned about the lenght of the loop and the heat transfer efficiency on the longer run).
2 - fitting a 'Y' shaped T where the two loops joing at the beginning of the single return line.
3 - remove the long single return line, extend the two loops to where they begin and join them on the same side of the house where they split, keeping the two valves system where they join. This would make it less of a nightmare to drain just because the valves would be in a more accessible location...
Any idea of what the second best option would be in this situation (where the best would be fire + new house)?
Mine is a closed system when i have to purge mine i run my output hose as high as i can to drain it, all the bubbles go up and out and i can do it myself. Why does yours need two people.
serviceguy
Well-Known Member
Mine is a closed system when i have to purge mine i run my output hose as high as i can to drain it, all the bubbles go up and out and i can do it myself. Why does yours need two people.

I tried to describe the system in the picture above, sorry for the lack of standard symbols but I don't have access to the usual tools required for the task...
The problem area is Loop 1, specifically when filling the system after it has been drained it looks that the water in Loop 2 prevents Loop 1 to get filled as air is trapped in it.
In order to fill the entire system I need to fill Loop 2, then close V2, fill Loop1 then reopen V2. As V1` and V2 are at other end of the house and in the crawlspace one person has to manage V1 and V2, the other has to manage the actual water valve and return drain (VR) in the boiler room.
View attachment 248290
I tried to describe the system in the picture above, sorry for the lack of standard symbols but I don't have access to the usual tools required for the task...
The problem area is Loop 1, specifically when filling the system after it has been drained it looks that the water in Loop 2 prevents Loop 1 to get filled as air is trapped in it.
In order to fill the entire system I need to fill Loop 2, then close V2, fill Loop1 then reopen V2. As V1` and V2 are at other end of the house and in the crawlspace one person has to manage V1 and V2, the other has to manage the actual water valve and return drain (VR) in the boiler room.
how are you purging? with a hose on a boiler drain/fill cock or using the quick fill?
I would split the zones before they leave the boiler "room" - add shut offs there, then ignore the ones at the far side - then purge each zone to the return - since air wants to come up, and water wants to come down, it shouldn't be that hard given enough velocity. (which the quick fill might not provide)
You could also add bleeders at the radiators/baseboard - each one being its own high spot, it should let the air out.
If there are no zone/balancing valves, this system probably doesn't work as intended anyway. one of the zones has to have less resistance, so it gets most of the water.
does it run through each baseboard or use venturi tees? They make smart valves now to throttle each baseboard.
Just purge the air every year, not drained. that adds more O2 into the system - not good.
Converting to one loop isn't horrible, although the last radiator will starve for heat.
serviceguy
Well-Known Member
Unfortunately the work I have to do requires to drain the loop that has the issue, the annual purge could be done at the boiler, as designed.
Water runs though each individual baseboard, otherwise those valve could turn very useful once we install the wood burning insert if everything goes according to plan (even though there's no plan yet and anyway NOTHING EVER GOES ACCORDING TO PLAN around here).
I installed bleeder on each radiator on loop 1, the section that does not have a problem (probably not the reason for the lack of issues but since I had the system emptied I though 'why not', I should have done it for the whole system).
I'm thinking I will bring all bleeding valves inside the 'boiler room' and add the inlet ones as well. At that point annual purge can be done at the designated location which is basically at the boiler. The two loops may even become separate zones eventually (I had the system designed with a spare zone ready to go, just need to add a second thermostat if so inclined).
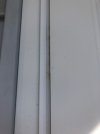
I have a storm door that sags almost 1/2”. Apparently the two top screws spin freely and seem to attach to nothing.
Photo shows the small original screws next to the two I hoped would cure the issue. Even the larger screws while I can snug down a bit still don’t really grab anything.
Not sure if it was an improper installation or what.
Photos of hinges and exterior too.
I did also insert a long screw and it will come out of the other side of the exterior trim without really grabbing anything.
Ideas?
Attachments
maybe get a dowel to put in there first?I have a storm door that sags almost 1/2”. Apparently the two top screws spin freely and seem to attach to nothing.
Photo shows the small original screws next to the two I hoped would cure the issue. Even the larger screws while I can snug down a bit still don’t really grab anything.
Not sure if it was an improper installation or what.
Photos of hinges and exterior too.
I did also insert a long screw and it will come out of the other side of the exterior trim without really grabbing anything.
Ideas?
View attachment 248593View attachment 248594
Not sure how to get into the channel. Also it seems like the screws should go into the wood in the door frame somewhere, but it’s just open behind the screws.maybe get a dowel to put in there first?
Fat Trout
Well-Known Member
Stuff a bunch of toothpicks in the hole then try the screw again....assuming the hole actually goes through some kind of wood and its just too big.I have a storm door that sags almost 1/2”. Apparently the two top screws spin freely and seem to attach to nothing.
Photo shows the small original screws next to the two I hoped would cure the issue. Even the larger screws while I can snug down a bit still don’t really grab anything.
Not sure if it was an improper installation or what.
Photos of hinges and exterior too.
I did also insert a long screw and it will come out of the other side of the exterior trim without really grabbing anything.
Ideas?
qclabrat
Well-Known Member
Yep, toothpicks and wood glue is also my go to repair. If metal, look for a thicker self tapping screw?Stuff a bunch of toothpicks in the hole then try the screw again....assuming the hole actually goes through some kind of wood and its just too big.
There is no wood there. Stuck an Allen wrench in there and it’s open space.Stuff a bunch of toothpicks in the hole then try the screw again....assuming the hole actually goes through some kind of wood and its just too big.
So I’ve tightened everything as much as possible and it’s better but still missing the strike plate holes.There is no wood there. Stuck an Allen wrench in there and it’s open space.
Would you lower the existing plate or try to modify the holes and make them a bit longer.
Pencil marks where it hits now. It was much worse before.

It's a weird install. I think because of the vinyl siding. The two top hinge screws seem to go into nothing but an aluminum channel. It seem to me that it should have gone into the door jam somehow. I attempted a long screw and it just comes out the other side into the vinyl siding. I was thinking about trying to drill a hole at an angle towards the house and hopefully grab part of the door jam.Much, much longer screws?
serviceguy
Well-Known Member
Would remove the door entirely to evaluate the situation be an option ? You may have to build an extension to the door jam using some appropriately size board to screw the storm door to. If the storm door was designed to connect to an aluminum channel you may install some threaded rivets on the aluminum channel to retain the screws more firmly...Not sure how to get into the channel. Also it seems like the screws should go into the wood in the door frame somewhere, but it’s just open behind the screws.