You are using an out of date browser. It may not display this or other websites correctly.
You should upgrade or use an alternative browser.
You should upgrade or use an alternative browser.
The DIY thread - DIYourself
- Thread starter Red Mosquito
- Start date
Well, since I don't ride a bike anymore......
20yo Dryer started making a clunk noise - was either going to be a partially shredded belt or bad roller.
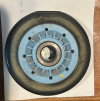
Diagnosis - two bad rollers - stuck (as in goo and lint) on the axle.
Check out the flat spot!
Quick search on Amazon for rollers and a new belt - since I have it torn down - ~$35 for next morning delivery.
Comes with a new idler pulley assembly too! Comparing the two, it def needed it.
Max apartedness 😉

A little over three hours total - including dropping the last screw behind everything.
Lots of time spent vacuuming the crap out of all the crannies - many spots with large clumps built up.
Back together, no extra screws - and quiet!

20yo Dryer started making a clunk noise - was either going to be a partially shredded belt or bad roller.
Diagnosis - two bad rollers - stuck (as in goo and lint) on the axle.
Check out the flat spot!

Quick search on Amazon for rollers and a new belt - since I have it torn down - ~$35 for next morning delivery.
Comes with a new idler pulley assembly too! Comparing the two, it def needed it.
Max apartedness 😉

A little over three hours total - including dropping the last screw behind everything.
Lots of time spent vacuuming the crap out of all the crannies - many spots with large clumps built up.
Back together, no extra screws - and quiet!

Last edited:
iman29
Well-Known Member
Phase 3 - RockDIY: Pool equipotential bonding edition.
So after a lot of research and good advice from @Mtbdog I launched my project the other day.
Phase 1: dig 4-6” trench that is 18” away from the pool wall.
I knew this was gonna suck but I probably should not have done this after my 55 mile very hilly ride.
Got the pick axe and shovels and chipped away for about 4 hours or so resulting in this.
Phase 2: run bonding wire and connect to pool skimmer and pool wall.
after a trip to HD with the middle son who also has learned quite a bit about electrical work, we figured out what we needed to make all the connections work.
Laid and buried the wire all the way around. Made the branch of connections for the under skimmer water bonding kit and the pool wall.
First challenge was to figure out how to connect to the pool since all the components of this pool are resin so this negates the need to connect 4 places around the pool. Connecting to the pool wall joint was something I read online about but I was VERY nervous to take the coping and side post apart to get to the bolts. But I read just taking one piece and loosening it up was no problem. Thanks to google I was able to find the common size of the pool wall bolts so we got a bonding lug and the same size nut and it fit perfectly. I was able to move the copings off and gently bend back the resin post enough to get a wrench in there. Nearly looks like it came that way.
The skimmer kit sits inside the pump skimmer with an exposed metal wire sealed off by a compression fitting that replaces the drain plug. Connecting to the wire also easy peasy.
The worst part of all this was the digging and backfill. Tamped down the dirt and prepped for river rock Edging sometime tmw or Monday - I guess that’s phase 3.
I am definitely getting too old for this shit but I learned a lot and happy with how it came together knowing it’s done properly. Oh and not having someone possibly get electrocuted is a bonus.
A few pics for the timeline. Now time for bed I’m BEAT!!
View attachment 264101View attachment 264102View attachment 264103View attachment 264104View attachment 264105View attachment 264106View attachment 264107View attachment 264108View attachment 264109
View attachment 264111
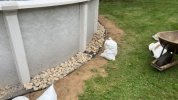
Spent the better part of Monday picking up and spreading out the river rock for the pool. After checking prices on the overpriced bags from the big box stores, I ended up at a local landscape place to get it in bulk myself. And it turns out they sell those thick plastic fabric bags to load and transport.
Did some calculations and figured I needed about 15 bags of 1" to 3" river rock. Lucky my oldest son was around to help me load or I dont know how I would have filled the bags without someone holding it open. This again was a lot more work then I anticipated, and the bags when full easily were 50-75 lbs each. took about 45-60 minutes to fill and load the bags. and all while making sure to pay attention to the lifting technique because after the 10th one i was spent. didnt help it was 90F out. I got worried my SUV was going to be overloaded after the 12th bag so my son took a few in his little mazda hatchback.
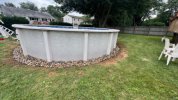
Got them home and used the wheelbarrow to transport 2 bags at a time and then we got to spreading them out. I felt at first the rocks were kinda big but once it was in place and i rinsed them off it looks pretty good. we came up about 4 bags short so I went back Tuesday to get a few more.
I wanted to add landscape edging but I’m out of time we are having huge grad party for my youngest Saturday. I’ll tackle that maybe in the fall. Or next spring.
total cost was less then $100 for all of the rock including buying the reusable bags. I probably lost 5lbs how much I’ve been sweating working on this. Jumping in the pool after I was done was a nice reward.


Red Mosquito
Formerly RLB the Scrapple Boy
Don’t wait too long, the weeds will find their way in there. I’ll spare you the pictures lolI wanted to add landscape edging but I’m out of time we are having huge grad party for my youngest Saturday. I’ll tackle that maybe in the fall. Or next spring.
iman29
Well-Known Member
Sometimes the simple DIY or redneck DIY makes me just as satisfied as a real DIY.
#1 Duct tape bug trap
Garage attracts all the bugs and the other night one of the boys left the main garage door open and inside was all kinda flying things. Went to the shelf and I’m out of the hanging fly paper glue things. Came up with this idea and within minutes there was bugs getting stuck.
#2 Line trimmer wind up
The bottom of the line trimmer usually has spots to turn with your fingers but I forgot today this was all worn out and was trying to get the lawn done. Had no time to run to store to buy a new trimmer head. Tried sticking some duct tape to turn it but no good. Then I came up with the idea to drill 2 small holes and use a needle nose pliers to turn it. Bingo.
I will have to replace this at some point soon. I think.😜


Came home from my ride this afternoon and ac isn't kicking on. Condenser unit outside not making any noise, no fan. Ideas? Got a guy coming between 8 and midnight tonight but wanna make sure he doesn't F me.
View attachment 264538
capacitor? lucky for me that was our problem a couple weeks back
Holy crap, i'm an idiot. So working on my bike in the basement before my ride today, i unknowingly bumped into the emergency switch and turned it off. Luckily i figured this out before the HVAC tech got here and cancelled my appointment. Saved myself $86 and much embarrassment (even though i'm confessing to you guys).
iman29
Well-Known Member
Surprised it’s so easily accessible my emergency switch is tucked away behind the main duct line.Holy crap, i'm an idiot. So working on my bike in the basement before my ride today, i unknowingly bumped into the emergency switch and turned it off. Luckily i figured this out before the HVAC tech got here and cancelled my appointment. Saved myself $86 and much embarrassment (even though i'm confessing to you guys).
For $50 ill swing by and put a piece of tape over the switch for you 😜😂
Holy crap, i'm an idiot. So working on my bike in the basement before my ride today, i unknowingly bumped into the emergency switch and turned it off. Luckily i figured this out before the HVAC tech got here and cancelled my appointment. Saved myself $86 and much embarrassment (even though i'm confessing to you guys).

Lots of options for similar.
Just finishing up a 25 year old repair. Bought our house in '98 and installed this nice expensive ceiling fan because it matched the decor. Circuit board blew about 13 months after that. Of course when I called Casablanca I was told the warranty on the board was 12 months and a new one was $200. F, that. So now 25 years later I finally ordered a new board so this thing would work.


Karate Monkey
Well-Known Member
Just finishing up a 25 year old repair. Bought our house in '98 and installed this nice expensive ceiling fan because it matched the decor. Circuit board blew about 13 months after that. Of course when I called Casablanca I was told the warranty on the board was 12 months and a new one was $200. F, that. So now 25 years later I finally ordered a new board so this thing would work.
View attachment 264639
Seems to be a running theme there. We also have a Casablanca that doesn't work,, for the exact same reason.
I've honestly thought about just pulling it down and putting another up there, except it's 15' in the air.
My Ohm Meter is currently MIA. Is this thing acceptable? I'd rather not spend too much as I will obviously find mine once I buy another one.
My Ohm Meter is currently MIA. Is this thing acceptable? I'd rather not spend too much as I will obviously find mine once I buy another one.
it will work - at least for a bit.
I haven't had any issues with the inexpensive ones.
As someone who used to use a multi-meter for work, I generally carried around the $10 shitty ones from Home Depot because they worked for 90% of the tasks as well as a Fluke and actually stood up to more abuse. And fit in my tool box better.
I haven't even taken my Fluke out of it's case in the last 2.5 years of living in this house now that I think of it, and grab the cheap meter every time for house/car stuff.
I haven't even taken my Fluke out of it's case in the last 2.5 years of living in this house now that I think of it, and grab the cheap meter every time for house/car stuff.
As someone who used to use a multi-meter for work, I generally carried around the $10 shitty ones from Home Depot because they worked for 90% of the tasks as well as a Fluke and actually stood up to more abuse. And fit in my tool box better.
I haven't even taken my Fluke out of it's case in the last 2.5 years of living in this house now that I think of it, and grab the cheap meter every time for house/car stuff.
this,
i did end up buying myself a mid grade Klein meters for some of the features my cheapo one didnt have
While not a 25 year fan project, this one was years between conception and completion.
Decorative oar project-
No before pics, but sanded, puttied and glued these things to get them presentable.
Used Benjamin Moore’s complimentary color finder to pick the palette to go with the house colors.
Lots of planning and looking at designs.


Even with temporary adhesive and good technique, still a little bleed through on the stenciling

Toothpick to the rescue

good enough for govt work
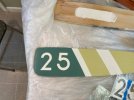
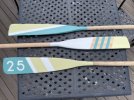
Now just coating with spray on water based varathane, then for the placement
Decorative oar project-
No before pics, but sanded, puttied and glued these things to get them presentable.
Used Benjamin Moore’s complimentary color finder to pick the palette to go with the house colors.
Lots of planning and looking at designs.


Even with temporary adhesive and good technique, still a little bleed through on the stenciling

Toothpick to the rescue

good enough for govt work


Now just coating with spray on water based varathane, then for the placement
Red Mosquito
Formerly RLB the Scrapple Boy
My toro “personal pace” mower stopped self-propelling about 1/4 into mowing this evening. The cable to actuate the system snapped. I was resigned to just pushing it the rest of the way, but it seems running it this way somehow adds drag to the wheels that isn’t there when the engine is off.
My quick assessment was that I could rig it up with a brake cable, so I stole the cable off my wife’s unused MTB but it turned out to be a few inches too short (TWSS). So I turned to my stash of shifter cables. I knew that would require more rigging due to the smaller cable ends, but I made it work. A few creative “knots” and lots of twisting later, I had a working solution. Just need to remember to order the correct part, and a new brake cable!

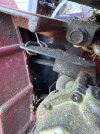

My quick assessment was that I could rig it up with a brake cable, so I stole the cable off my wife’s unused MTB but it turned out to be a few inches too short (TWSS). So I turned to my stash of shifter cables. I knew that would require more rigging due to the smaller cable ends, but I made it work. A few creative “knots” and lots of twisting later, I had a working solution. Just need to remember to order the correct part, and a new brake cable!


Red Mosquito
Formerly RLB the Scrapple Boy
Saving for full suspension firstAXS is the answer.


